


Building a session from A to Z

Creating a session isn't that easy: you can run out of inspiration, not know enough, or feel completely lost. In short, we've all asked ourselves: "what am I going to do today..."
But don't worry: here you'll learn all the secrets of French Football Federation (FFF) courses and coach educators, so you always find inspiration and always know what to work on in advance.
So sit back, champ, we're going to see how to create the perfect session from A to Z.
This course is divided into 6 chapters
1- Training methods
2- Teaching styles
3- Game principles
4- Playing areas
5- How a session is structured
6- Designing the session
1- Training methods
Drills
People commonly call training methods "drills", but that's actually a misuse of the word. A drill is a training method with its own instructions, teaching style and objectives, and you'll see that you can't call just anything a "drill".
Drills are used to work on technical skills. The aim of a drill is to focus almost exclusively on technique (passing, shooting, combinations, flicks, etc.), all without opposition. They are what people usually call passing / shooting circuits.
A drill uses a specific teaching style, because it calls for a directive approach (see chapter: Teaching styles).
In a drill, the player performs a movement or technical skill, imitates or copies it, and corrects himself by repeating it.
Drills fall into 2 categories:
Analytical drills
Training methods are really the heart of training: it's simply the moment when our players practise.
There are 3 training methods in total
Drills
Situations
Games
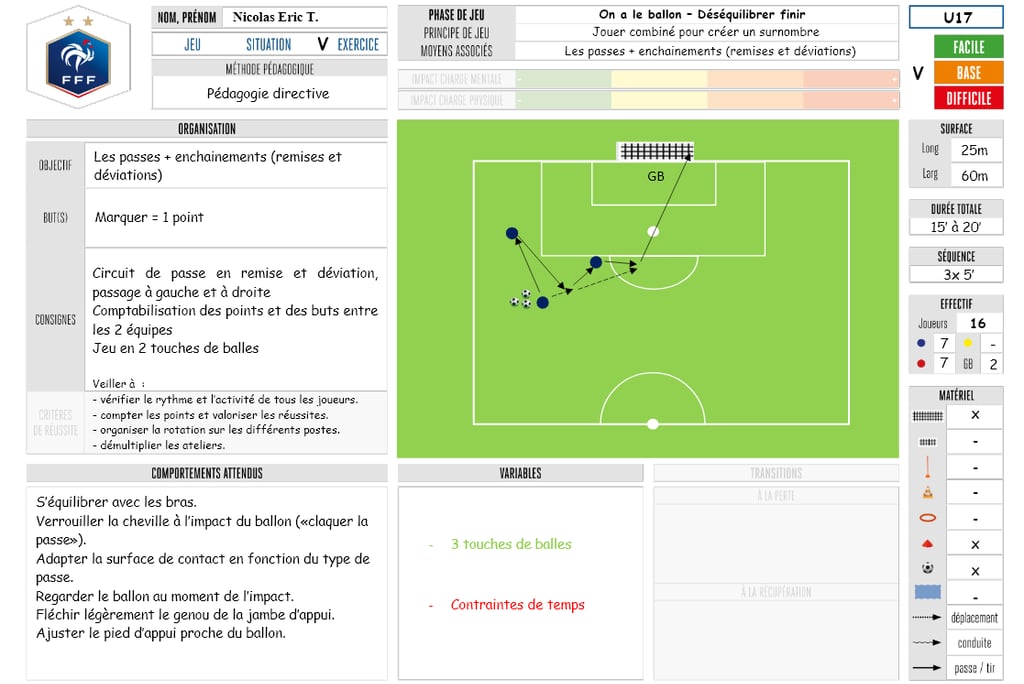
An analytical drill is simply a basic form of work with little information to take in, in other words a set circuit with no adaptation or changes by the player.
FOR EXAMPLE
Adaptive drills
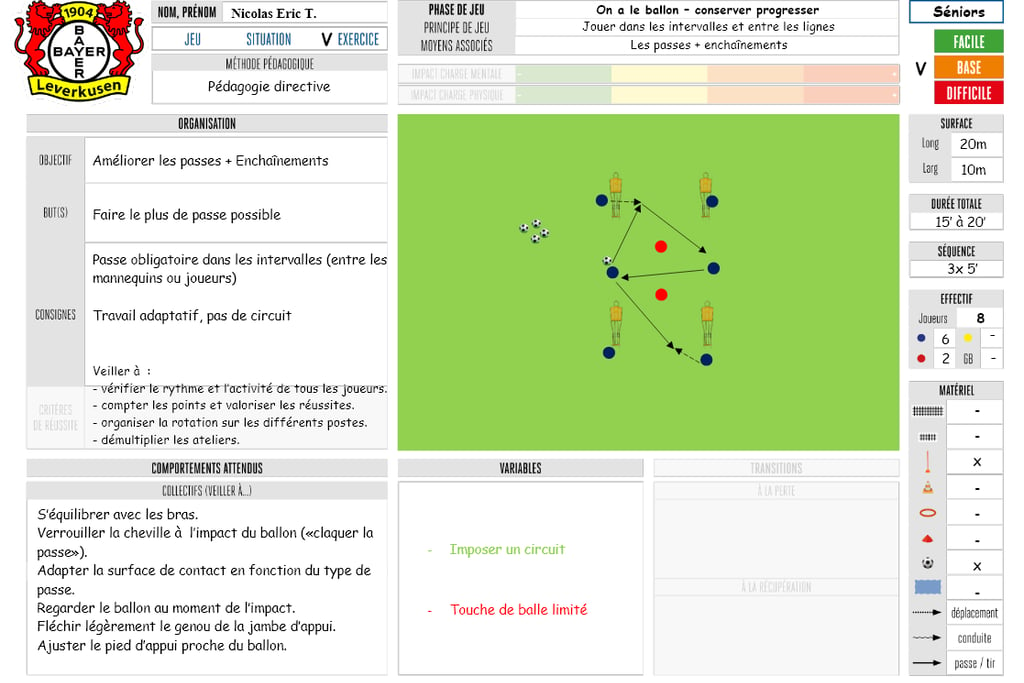
Adaptive drills, on the other hand, involve multiple-choice work (skills or players) with a lot of information to take in. The circuit is no longer set: the players have to read the situation to choose the right solution and complete the circuit.
FOR EXAMPLE
Situations
A situation is simply a match action that you take and recreate in training. It doesn't matter whether it's attacking or defensive, about keeping the ball or finishing: if your players struggle with that specific moment of the match, you recreate it in training and add instructions and constraints to work on it.
A situation is always attack versus defence. It's always the same players attacking and the same players defending, over a series of 5 actions. The ball comes into play: that's the first action. It goes out or the goal is reached, the action stops and you move straight on to the second, the third… After the fifth, you rotate: the attackers become defenders and the defenders become attackers.
A situation has to be quick. Throw-in, corner, goal kick, foul, it doesn't matter: you stop and restart from the beginning straight away. It's pure repetition; you replay the action as many times as possible.
Another very important feature: attackers and defenders do not have the same goals, instructions or objectives. So there is always a double workload: even if your session is about attacking, your defence is also working towards its own objectives (winning the ball, protecting the goal, counter-attacking).
And what about the famous numerical imbalance?
On coaching courses, you'll be told that a situation must always involve a numerical advantage or disadvantage. The coaches who taught me the job taught me the opposite: imposing a +1 or -1 that adds nothing to your situation is pointless. If the numerical imbalance is relevant to the match action you want to work on, it will come naturally. And if the numbers are equal, that's absolutely fine: it's still a situation, because it's a match action that you recreate and repeat.
FOR EXAMPLE
With U13s, on the theme getting free to draw, beat, pass or finish : 3 attackers against 2 defenders in the middle, in a small area, with one player confined to the penalty box to make it easier to get free. The attackers have to score; the defenders have to win the ball, protect the goal and counter-attack. Different goals, so a double workload.
Games
The game is many coaches' favourite training method, to the point that some do nothing else: warm-up, game, game, game. That's not a good idea. You should always vary and mix drills, situations and games in the same session so players experience a wide range of methods and improve.
A game is an opposition : equal numbers, or a small imbalance of one player at most (7 v 8, 8 v 8, 9 v 8, but certainly not 10 v 3). Both teams have the same objectives, the same goals and the same instructions. If you have the ball, you attack; if you lose it, you defend. It's basically the opposite of a situation.
There are 4 forms of game. In your own sessions, you can simply write "game". But if you're taking your coaching badges, you absolutely need to know all four:
Form 1: the rondo, toro or possession game
Two opposing teams with shared goals and instructions, but no direction of play : no goals, you go left, right, forwards, backwards. Rondo, toro or possession game, it's the same thing, pick the term you prefer. Here, a numerical advantage or disadvantage is possible.
Form 2: the themed game
This time there is a direction of play : you attack goals and protect your own, as in a match. Equal numbers (or +1 / -1), shared objectives, goals and instructions. It's a themed match, with instructions strong enough to get the players into the theme. The whole art is finding the right balance: too many instructions and the game becomes incomprehensible, too few and you end up with a simple match.
Form 3: the situation in disguise
Form 3 is attack versus defence, with different goals and instructions… but with equal numbers. In other words, it's a situation. It only exists to justify the idea that a situation must always involve a numerical imbalance. Know it for your courses and badges, but in your own training, call it by its real name: a situation.
Form 4: the end-of-session game
This is the game that finishes your session. Same basis as form 2 (opposition, system of play, direction of play, shared objectives and goals), but with much simpler instructions. You remove whatever makes the game complicated and keep one or two instructions that recall the theme. At the start of the session, you put the players in front of the problem; at the end, you check that they can solve it and transfer it to a match.
The little extra secret: the match scenario. For example, over 3 periods of 5 minutes: the blues lead 1-0, then the reds lead 1-0, then it's 1-1. There are 5 minutes left, it's the 85th minute: the team in front must protect its lead, the other must get back into the game. It adds the psychological pressure of a real match, and that changes everything. You'll find a complete example in chapter 6.
To sum up: form 1 for the warm-up, form 2 to get into the theme, form 3 is a situation, and form 4 with a scenario to finish the session.


2- Teaching styles
Now that you know the training methods, you need to know how to run them. Teaching style is the way you talk to the players and run the session. You won't coach a drill, a situation and a game in the same way. There are two teaching styles: the directive approach and the active approach.


The directive approach
You use it in the warm-up and in drills. As the name suggests, you are directive: you're the "old-school" coach. The player isn't free; you guide his positioning, his choices, the way he controls, passes, shoots and moves. You demonstrate, you have him repeat and you correct constantly.
Careful: being directive doesn't mean applauding anything or being unfair. If your player shoots wide, don't tell him "good shot". You can praise the intention, but you correct: "open your foot a bit more, place your standing foot like this". Technique is learned through direction and repetition.
The active approach
It's the opposite, and you use it in games and situations. The player is free to make his own choices: he passes to whoever he wants, with whatever part of the foot he wants, and invents his own combinations. Your role is to give him all the tools to understand the objective, solve the problem, follow the instructions and score as many points as possible.
That doesn't mean staying silent. You're no longer directing the player, you're running the game: you set the tempo, you encourage, you ask questions and you help your players find the solution themselves.
To sum up: the directive approach in the warm-up and in drills, active approach in games and situations.


3- Game principles
You can't create a training session without a clear thread: the theme. And to find it, you need to follow an order: first the phase of play, then the game principle.
The phases of play
There are two main phases: we have the ball and we don't have the ball. Each is divided in two:
We have the ball: keep possession and progress, then unbalance and finish.
We don't have the ball: stop the opponent progressing, then organise to protect our goal.


The 9 game principles
Each game principle is linked to a phase of play:
We have the ball – keep possession and progress
Create and use space
Play in the gaps and between the lines
We have the ball – unbalance and finish
Switch play after drawing the opponent in collectively
Combine to create an overload
Get free to draw, beat, pass or finish
We don't have the ball – stop the opponent progressing
Slow down the opponent's progress
We don't have the ball – organise to protect our goal
Organise when out of balance
Crowd and be active in the direct channel
Protect the goal, win or clear the ball
Your session must always be built around one of these principles, with an objective. You don't say "today we're working on shooting", you say "today we're working on how to get free to draw, beat, pass or finish". A session isn't dedicated to a technique, it's dedicated to a game principle.


4- Playing areas
Understanding the playing areas is the key to understanding the phases and principles of play, and therefore to building your session very easily. Don't worry, there aren't 36 of them: you simply divide the pitch into three parts.
The possession area : between the ball carrier and his goalkeeper. It lets you find players in support.
The progression area : between the ball carrier and the most advanced striker. It lets you find players to play off and move forward.
The unbalancing area : behind the opponent's last defensive line (the line, not the last player).
Thanks to the playing areas, you know where to place your work. If you want to create and use space, you're in the keep possession and progress phase, so in the possession and progression areas. If you want to combine to create an overload, you're in the unbalance and finish phase, so in the unbalancing area: your drills, situations and games will take place in the final third of the pitch.


5- How a session is structured
A session should last between 1h30 and 1h45. Not too short, not too long: beyond that, fitness and concentration drop, and in amateur football nobody has 2h30 for every training session. Here is the structure I recommend, the one I've tested and refined over the years:
1. The warm-up (15 to 20 minutes)
It's done in two parts. First a warm-up with the ball of about 10 minutes: you raise the body temperature and work on running drills, joints and muscles, but with the ball, which is far more motivating for a player coming straight from school or work. Then a form 1 game : possession, rondo or toro. Allow 15 minutes in summer and 20 minutes in winter.
2. The game or the drill
Either a form 2 game, with specific instructions to immerse the players in the theme, its problems and its solutions. Or an analytical or adaptive drill for pure technical work, always linked to the game principle.
3. The situation
The match action recreated in training, attack versus defence, repeated as many times as possible.
4. Fitness (10 minutes minimum)
It's almost never talked about on coaching courses, yet it's as important as technique and tactics. For children: motor skills, coordination, balance, core work. For teenagers: core work and the start of cardio. For adults: strength work, cardio, core work, 15/15 intervals. For example, 5 minutes of 15/15 then 5 minutes of core work: it stings, trust me. Put it in the middle of the session, after the situation (or just before), never too early or too late.
5. The end-of-session game
A form 4 game with a match scenario, to put into practice everything worked on during the session.
6. The cool-down
Never send your players to the showers straight after the final whistle. Gather them, sit down, stretch and debrief the session or the next match. Five minutes is enough, and stretching is essential (I explain why in my article on stretching).


6- Designing the session
Let's get practical, champ: we're going to build a complete session together, starting from nothing. It's the hardest case, the blank page : no objective, no phase of play, no game principle.
Step 1: find the objective
The most important thing when designing a session is theobjective. The phase and the game principle will be built around it. And to find your objective, start from a problem you see in matches.
Example: my team concedes a huge number of goals when it defends deep, especially from crosses, free kicks, corners and balls over the top. So my objective will be toimprove winning the ball back and protecting the goal in a low block.
Step 2: the area, the phase and the game principle
I don't have the ball, so I put myself in the opposing striker's shoes: to score, he gets past my last defensive line, so he is in theunbalancing area. From that I deduce the phase of play, we don't have the ball – organise to protect our goal, and the game principle, protect the goal, win or clear the ball.
Remember the reasoning: a problem → an objective → the playing area → the phase of play → the game principle.


Step 3: numbers, pitch, duration and equipment
Numbers : adapt to the number of players you expect. With a squad of 18 and a few absentees, plan for 14 players. No need for 11 v 11 for a defensive session near the goal: focus on defenders and midfielders.
Dimensions : you're working in the unbalancing area, so no need for half a pitch. The length of two penalty areas (33 m) and the full width of the pitch (70 m) to work on crosses and wide balls.
The little secret: keep the same dimensions from the start to the end of the session. Changing pitch for every activity wastes time and forces players to keep readjusting. With a fixed pitch, they make the space their own and progress much faster.
Duration : between 1h30 and 1h45. Equipment : it follows from the instructions. Here, disc cones to mark out the pitch, balls of course and at least one goal.
One last secret before you start: split your group into two teams, the blues and the reds, and have them compete from the start to the end of the session, with a small forfeit for the team that scores the fewest points. Competitive spirit and player commitment shoot up, from U13s to seniors.
Part 1: the warm-up
First part, 10 minutes: a circuit inspired by Atalanta. A square with an activity on each side (mini hurdles for high knees, disc cones for side steps, a speed ladder for coordination, poles for agility) and, between the sides, receive-and-pass activities using every part of the foot. The ball is there from the first minute: we're doing football, not athletics.
Second part, without a break: a form 1 game. As the theme is defensive, we give the attack a big advantage to make the defence work: a possession game with support players around the square. The defenders have to read the play, anticipate runs and passes and move together. Another option: jockeying duels, one player dribbles towards a partner who backs off while working on his defensive footwork.
FOR EXAMPLE


Part 2: the drill
A drill is technical work. But what is the technique of a player without the ball? It's defensive technique: closing down, intercepting, tackling, jockeying, winning duels. So our drill will focus on defensive duels, with the objective of improving goal protection in one-on-ones and winning the ball back.
Setup: one attacker and one defender in the box, a red crosser on each wing with a supply of balls, and two blue partners confined outside the box to receive the ball once it's won. The cross is free, along the ground or in the air, and don't forget that the goalkeeper is a teammate : he's not a statue, he can come out to intercept.
Points: the blues score 3 points if they win the ball and find a partner; the reds score 1 point if they touch the ball first, and 3 points if they score.
Variations: to make it easier, crosses only in the air or only along the ground (the defence knows what to expect). To make it harder, the second cross comes in as soon as the first action stops: the defence has no time to reorganise. Play 3 periods of 5 minutes, and since the session is defensive, you only coach the defenders.
FOR EXAMPLE


Part 3: the situation
We go back to the match action that causes problems: the opponents cross from the wings and we can't win the ball. On the same pitch, place the players according to your system of play: for example 4 defenders in a low block against 4 attackers in the middle, a crosser on each wing, and two wide partners further away to receive the ball once it's won.
Instructions: offside applies, start in a wide zone, only players in the central zone may attack, and once the ball is won it is passed to the players in the zones. The blues score 1 point per ball won and 3 points if they find a support player; the reds score 3 points per goal.
A defender will inevitably ask you: "Can I go and press the crosser?" Yes, nothing forbids it. But if he steps out, his defence is left 3 v 4 in the middle. That's exactly a problem to solve together during the session.
Variations: if it's too hard, give the defence a numerical advantage in the middle. If it's too easy, the opposite wide player can come into the middle to create a 5 v 4. Work in series of 5 actions, then switch roles, for 15 minutes.
FOR EXAMPLE


Part 4: fitness
Adapt it to the fixture list. The day before a match, light work: footwork, agility, motor skills, coordination. Two or three days before, strength work and intense cardio. For example, 15/15 over 75 m: 15 seconds running, 15 seconds rest, 10 reps, so 5 minutes. Then everyone on the ground for 5 minutes of core work (front, sides, obliques, transverse).
At the end of the week, a coordination activity with ladders, slaloms and changes of pace, followed by a little strength work on the ground. And no, it's never too late to work on coordination, even with adults.
FOR EXAMPLE


Part 5: the end-of-session game
A form 4 game to put into practice everything you've seen. Objective, phase and game principle, numbers and dimensions stay the same. This time it's a 6 v 6 game with two goalkeepers, no zone restrictions, and one instruction to recall the theme: the goalkeeper always restarts play through the middle. On a wide pitch with few players, the attackers will naturally find the flanks to cross.
The scenario: the blues lead 1-0, there are 5 minutes left, it's the 85th minute. A goal is worth 1 point, but a goal from a cross is worth 3 points. The blues have to be perfect in defence, win the ball and counter-attack to extend their lead. In the second period the reds are in front; in the third it's 1-1, and both teams have to attack while staying solid at the back.
Variations: if it's too hard, limit the attackers' touches. If it's too easy, the first pass into the wide zone becomes undefendable.
FOR EXAMPLE


Part 6: the cool-down
Everyone on the ground, stretching and a debrief: did the players understand the session properly? Talk about the next match or the next training session. It's time to unwind, but the coach always leads the discussion.
And there you go, champ: you've just built a complete 1h30 to 1h45 session, starting from a blank page. We found a problem, turned it into an objective, and everything else followed from it. This method works for any objective, any phase and any game principle.
Over to you: create your own session and show it to me on my social networks or in the comments of the video, it would make me really happy!
🎧 Watch in English: on YouTube, click ⚙️ Settings › Audio track › English. You can also turn on English subtitles in ⚙️ Settings › Subtitles.